Microsoft Teams bot setup
Stand up the Azure bots for your agents, grant the Microsoft Graph permissions, then connect them in the console.
To run Awk agents inside Microsoft Teams, each agent talks to Teams through a bot you own — an app registration in your own Microsoft Entra (Azure AD) directory. You create the bots, grant them the Microsoft Graph permissions they need, and then paste three values into the Awk Teams console, which handles the Teams app packaging and installation for you.
This guide walks a tenant administrator through the whole flow. Budget 30–45 minutes the first time.
Availability: Microsoft Teams is in preview — request access to join. Your Awk Teams representative will confirm it is enabled for your team and give you the messaging endpoint URL referenced in Step 2. Prefer Slack? See the Quickstart instead.
What you'll set up
Awk Teams ships four shared agents, and each one is a separate bot you register in your directory:
| Agent | Role |
|---|---|
| OG | Primary engineering agent |
| QA | Quality assurance agent |
| Oracle | Delivery/knowledge agent |
| P.Chief | Personal chief of staff |
You only need to register the agents you plan to use. Every bot follows the same five steps below, so the fastest path is to do OG end-to-end first, then repeat for the others.
Before you start
You'll need:
- →A Microsoft Entra (Azure AD) tenant and an account with the Global Administrator (or Privileged Role Administrator) role — granting admin consent in Step 4 requires it.
- →A Microsoft 365 subscription that includes Teams (Business Basic, Business Standard, E3/E5, or Teams Essentials) with Teams licenses assigned to the people who will talk to the agents.
- →An Azure subscription to hold the bot resources. The bots use the F0 (free) tier — there is no charge for the bot service itself.
- →The Azure CLI if you want to script the setup
(
az login --tenant <your-tenant-id>), or you can do everything in the Azure portal.
Have your Tenant ID handy — find it at Entra admin center → Overview → Tenant ID. You'll paste it into the console at the end.
Step 1 · Create the bot app registration + secret
Do this once per agent. The example uses OG; change the display name for QA, Oracle, and P.Chief.
Each app registration must be single-tenant (AzureADMyOrg) so the
bot only accepts sign-ins from your own directory.
Azure portal
- →Go to entra.microsoft.com → Applications → App registrations → + New registration.
- →Name: e.g.
AwkTeams OG Bot. - →Supported account types: Accounts in this organizational directory only (Single tenant).
- →Leave Redirect URI blank and click Register.
- →Copy the Application (client) ID from the overview page — you'll need it for the console.
- →Go to Certificates & secrets → + New client secret, give it a description and a 24-month expiry, and copy the Value immediately (it is shown only once).
Azure CLI
# --- Create the app registration (single-tenant) ---
OG_APP=$(az ad app create \
  --display-name "AwkTeams OG Bot" \
  --sign-in-audience "AzureADMyOrg" \
  --query appId -o tsv)
echo "OG Bot App ID: $OG_APP"

# --- Create a client secret (2-year expiry) ---
OG_SECRET=$(az ad app credential reset \
  --id "$OG_APP" --years 2 --query password -o tsv)
echo "OG Bot Secret: $OG_SECRET   # save this now — it is shown once"

# --- Ensure the service principal exists ---
az ad sp create --id "$OG_APP" 2>/dev/null || true
Save each App ID and secret securely. You'll paste the App ID and secret into the console in Step 5. The secret is stored encrypted in the Awk Teams credential store and is never shown again after you submit it.
Step 2 · Enable the Microsoft Teams channel
A bot needs an Azure Bot resource that connects your app registration to the Bot Framework, with the Microsoft Teams channel turned on.
Azure portal: search for Azure Bot → Create, then set:
- →Bot handle: e.g.
awkteams-og - →Pricing tier: F0 (Free)
- →Type of app: Single Tenant
- →App ID: the Application (client) ID from Step 1
- →Tenant ID: your Entra tenant ID
After it's created, open the bot → Channels → Microsoft Teams, accept the terms, and Apply. Then, under Configuration, set the Messaging endpoint to the URL your Awk Teams representative gave you (all your bots use the same endpoint).
Azure CLI equivalent:
RESOURCE_GROUP="awk-teams-bots"   # any resource group you own
TENANT_ID="<your-tenant-id>"
ENDPOINT="<messaging-endpoint-from-awk-teams>"

az bot create \
  --resource-group "$RESOURCE_GROUP" --name "awkteams-og" \
  --app-type SingleTenant --appid "$OG_APP" \
  --tenant-id "$TENANT_ID" --sku F0

# Turn on the Microsoft Teams channel
az bot msteams create --resource-group "$RESOURCE_GROUP" --name "awkteams-og"

# Point the bot at the Awk Teams messaging endpoint
az bot update --resource-group "$RESOURCE_GROUP" --name "awkteams-og" \
  --endpoint "$ENDPOINT"
Step 3 · Add the Microsoft Graph permissions
Each bot needs four Microsoft Graph application permissions so the agent can see channels and messages — and route direct messages.
| Permission | Why the agent needs it |
|---|---|
ChannelMessage.Read.All | Read messages (and thread replies) in the channels the bot is added to |
Channel.ReadBasic.All | List the channels in a team |
Team.ReadBasic.All | Identify the team the bot belongs to |
User.Read.All | Required for direct messages — resolve who sent a 1:1 DM so the agent can reply. Without it, DMs are silently dropped; channel messages still work. |
Azure portal
For each bot app: **App registrations → [your bot] → API permissions →
- →Add a permission → Microsoft Graph → Application permissions**, then add all four permissions above and click Add permissions.
Azure CLI
GRAPH="00000003-0000-0000-c000-000000000000"

az ad app update --id "$OG_APP" --required-resource-accesses '[{
  "resourceAppId": "00000003-0000-0000-c000-000000000000",
  "resourceAccess": [
    {"id": "7b2449af-6ccd-4f4d-9f78-e550c193f0d1", "type": "Role"},
    {"id": "59a6b24b-4225-4393-8165-ebaec5f55d7a", "type": "Role"},
    {"id": "2280dda6-0bfd-44ee-a2f4-cb867571a190", "type": "Role"},
    {"id": "df021288-bdef-4463-88db-98f22de89214", "type": "Role"}
  ]
}]'
Adding the permissions only declares them. They do nothing until an administrator consents to them — that's Step 4.
Step 4 · Grant admin consent
Application permissions require tenant-administrator consent.
Azure portal
On the bot's API permissions page, click Grant admin consent for [your organization], confirm, and check that all four permissions show a green Granted status.
Azure CLI
az ad app permission admin-consent --id "$OG_APP"⚠️ Watch out for the silent-consent trap.
az ad app permission admin-consentfrequently exits successfully but does not actually create the grant — the portal still shows the permissions as "Not granted". If you hit this, grant the app roles directly with the snippet below. Re-run the check afterward.
Reliable fallback — assign the app roles directly
This creates each Graph app-role assignment explicitly, which is the
dependable way to land the grant. Run it per bot (set BOT_APP_ID):
BOT_APP_ID="$OG_APP"                                   # the bot's App (client) ID
GRAPH_APP_ID="00000003-0000-0000-c000-000000000000"    # Microsoft Graph (constant)

# Service-principal object IDs in YOUR tenant
GRAPH_SP=$(az ad sp show --id "$GRAPH_APP_ID" --query id -o tsv)
BOT_SP=$(az ad sp show --id "$BOT_APP_ID" --query id -o tsv)

# The four Graph application-permission IDs (Microsoft constants):
#   ChannelMessage.Read.All  7b2449af-6ccd-4f4d-9f78-e550c193f0d1
#   Channel.ReadBasic.All    59a6b24b-4225-4393-8165-ebaec5f55d7a
#   Team.ReadBasic.All       2280dda6-0bfd-44ee-a2f4-cb867571a190
#   User.Read.All            df021288-bdef-4463-88db-98f22de89214
for ROLE_ID in \
  7b2449af-6ccd-4f4d-9f78-e550c193f0d1 \
  59a6b24b-4225-4393-8165-ebaec5f55d7a \
  2280dda6-0bfd-44ee-a2f4-cb867571a190 \
  df021288-bdef-4463-88db-98f22de89214; do
  az rest --method POST \
    --uri "https://graph.microsoft.com/v1.0/servicePrincipals/$BOT_SP/appRoleAssignments" \
    --headers "Content-Type=application/json" \
    --body "{\"principalId\":\"$BOT_SP\",\"resourceId\":\"$GRAPH_SP\",\"appRoleId\":\"$ROLE_ID\"}"
done
Verify the grant landed:
az rest --method GET \
  --uri "https://graph.microsoft.com/v1.0/servicePrincipals/$BOT_SP/appRoleAssignments" \
  --query "value[].appRoleId" -o tsv
You should see all four role IDs listed. In the portal, every permission should now show a green Granted check.
Step 5 · Register the bot in the console
With the bot created and consented, connect it in the Awk Teams console.
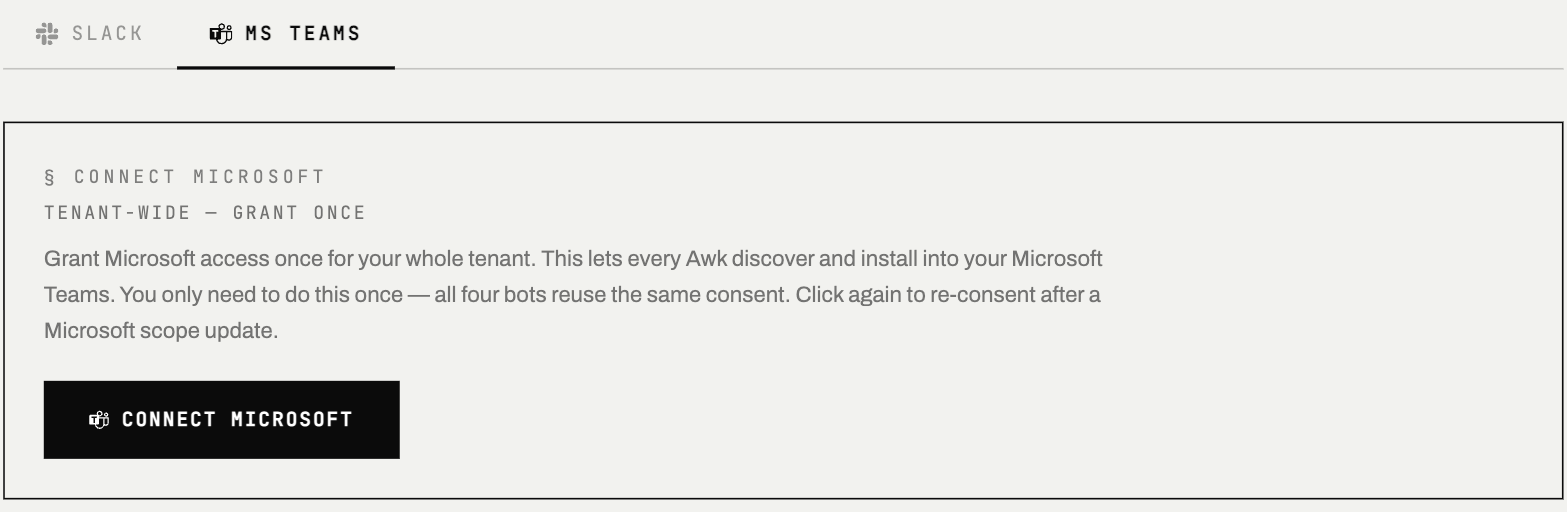
1. Open the console → Awks hub → the MS Teams tab. The first time, click Connect Microsoft once to grant Awk Teams tenant-wide access — all four bots reuse the same consent, so you only do this once.
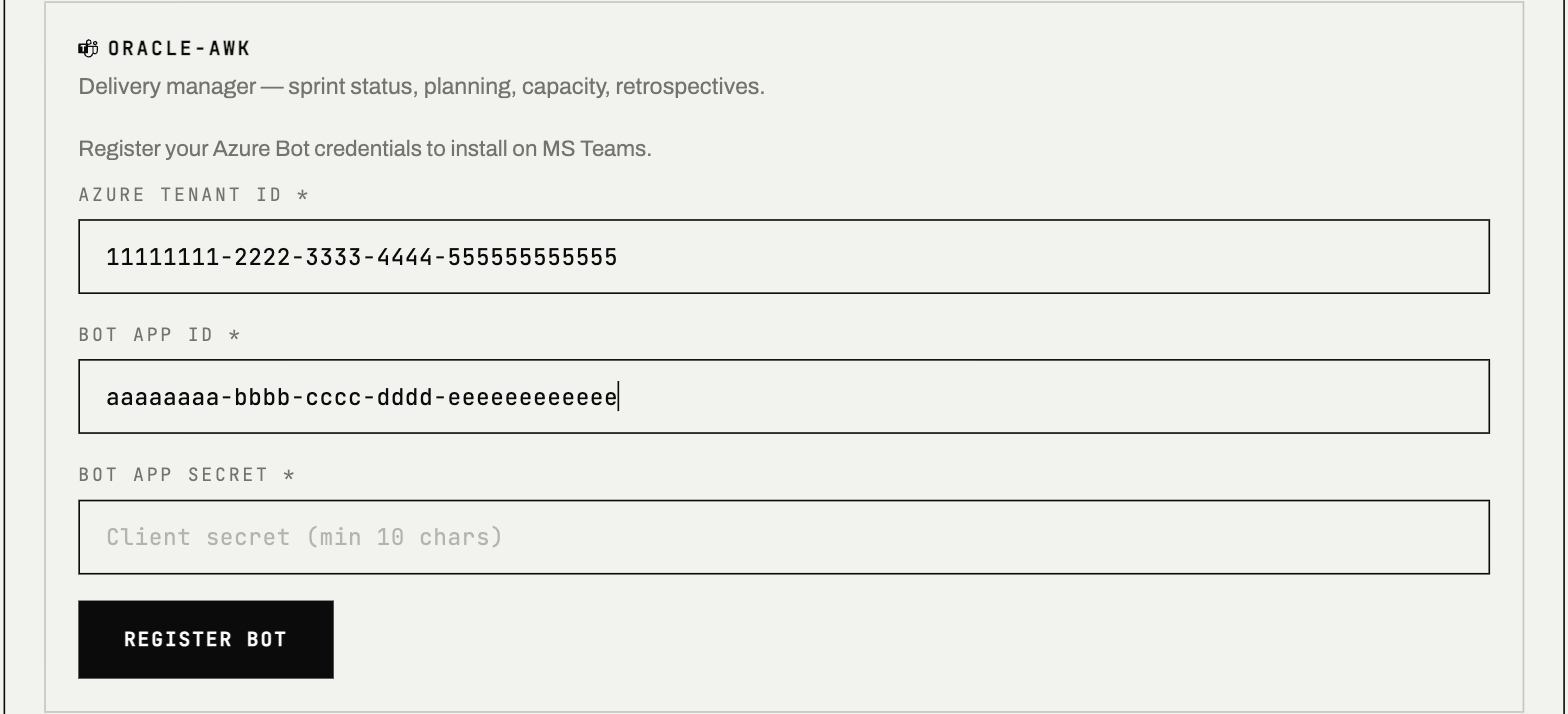
2. Find the agent's card and enter the three values, then click Register:
- →Azure Tenant ID — your Entra directory ID
- →Bot App ID — the Application (client) ID from Step 1
- →Bot App Secret — the client secret value from Step 1
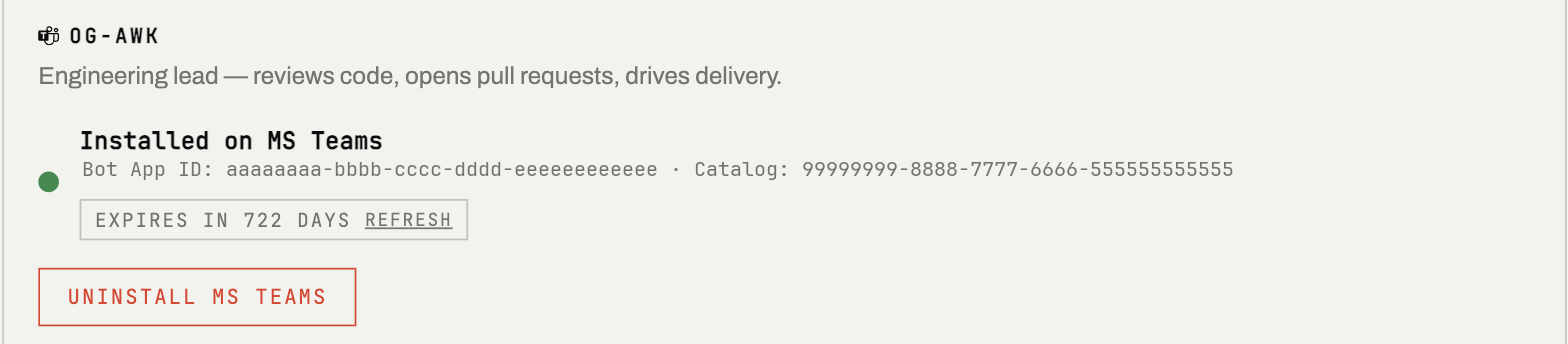
3. Click Install, then pick the Microsoft Team to add the agent to. The console packages the Teams app and installs it for you. Once it's in, the card shows the bot as installed:
Repeat Steps 1–5 for each agent you want in Teams.
Why these permissions
Agents reach Teams through two Microsoft surfaces, and only one of them needs admin consent:
- →Bot Framework (the bot's own identity) handles sending and replying to messages and reading who is in a conversation — no Graph consent required.
- →Microsoft Graph (the four application permissions above) is what lets an agent list channels, read message history, and resolve the people it's talking to. These need the admin consent from Step 4.
That split is why User.Read.All matters so much: replying in a channel
works on the Bot Framework path alone, but a 1:1 direct message can
only be routed to the right agent once Graph can resolve the sender — so a
DM to a bot without User.Read.All is silently dropped.
For a capability-by-capability breakdown of which permission powers what, see Microsoft Teams permissions.
Troubleshooting
Channels work, but direct messages get no reply. The bot is missing
User.Read.All (or its consent didn't land). Add it in Step 3 and grant
consent in Step 4 — use the direct app-role fallback if the portal still
shows "Not granted".
Permissions still show "Not granted" after admin-consent. The CLI
command exited without creating the grant (a known Azure quirk). Use the
direct app-role assignment fallback in Step 4, then re-verify.
403 Forbidden (missing <Permission>) on a channel read. The Graph
permission for that capability isn't consented yet. Confirm all four
permissions show green in the portal.
The bot shows "unavailable" in Teams. Teams caches a failed bot per conversation. Reset the Teams channel on the Azure Bot resource, remove the app from the team, and re-install fresh from the console — don't reuse the old chat.
Client secret expired. Create a new secret under Certificates & secrets, then re-register the bot in the console (or contact Awk Teams support) with the new value.